You may be interested
Art Nouveau Monograms
Christmas Preparation
Now on Sale!
Retro Embroidery
Embroidery Supplies
Secrets of Machine Cross Stitching

Machine cross stitch designs are used JUST LIKE regular machine embroidery designs - they come in all the standard machine formats (e.g. PES, HUS etc....), and don't require anything special whatsoever. Yet, they look a bit different when finished. At the end of this page you'll see several photos of ready cross stitch projects
Machine cross stitch designs have a couple of big advantages over regular designs. First - this technique allows to offer each design in 3 sizes (and densities). Second - cross stitch technique is wonderful for making very detailed, natural looking designs, with light and shade effects. To better understand, take a look at a few collections in our machine cross stitch designs category.
The smaller version of same design comes out looking almost like regular embroidery design because of increased density and fabric coverage, while the larger version really looks like traditional cross stitch. You'll see that on photos below.
What Is "Count Size"?
As mentioned earlier, our machine cross-stitch embroidery designs are offered in 3 sizes. In cross-stitching terms this is called count sizes - 14, 16 and 18. These numbers indicate how many stitches per inch are in design. The higher the count, the denser and smaller the design. It goes this way:
14 counts/inch - large size - fairly loose
16 counts/inch - medium size - medium density
18 counts/inch - smallest size - most dense
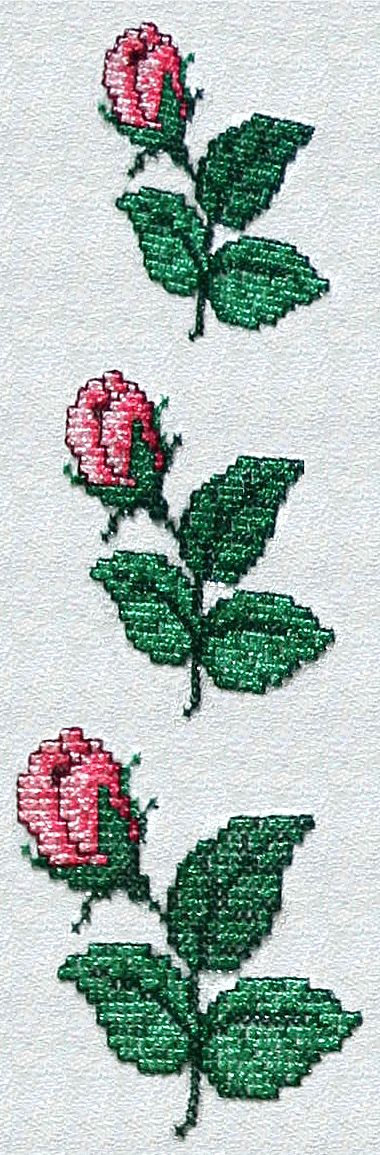
Here is a close-up photo of rosebud design, embroidered in 3 different counts. By the way - this rose is available for download via our free embroidery designs archive, so you may try it out by yourself.
Determining Suitable Count Size
1. First, check out the final size of your design in each count, and decide which SIZE of the design will better fit your current project. This shall be the primary reason for choosing between 14, 16 or 18-counts.
2. If design size doesn't matter that much for your project, do as follows:
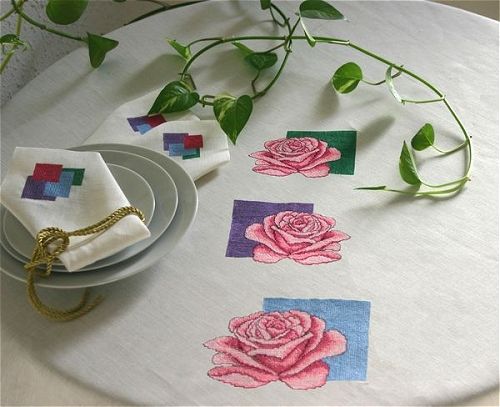
3. Sometimes it may be interesting to use one design in all three count sizes, within a single project. Here is an example:
The same rose has been embroidered on tablecloth in three different counts. The largest design is close to us, and the opposite. Such positioning of designs, one after another, creates a feeling of perspective and depth, because our brain thinks that the smaller roses are a lot farther away than they actually are. You may take advantage of this trick every time you want to add 3-d effect to your scenes. For example, to make a quilt with paradise garden, etc.
Thread for Machine Cross-Stitching
Regular poly and rayon embroidery thread (40wt) is great for machine cross stitch designs. Just be sure to get enough thread colors, since cross stitch designs often call for 3-4 gradient colors within each color family, to create the desired light and shade effects. If you have access to thick (30 wt) cotton machine embroidery thread, it's worth trying with 14-count designs (for 16 and 18-count designs thick cotton thread looks too bulky). Bear in mind that cotton thread breaks quite easily, so it may cause you some troubles. But it IS beautiful.
What Fabrics to Choose?
Cross-stitch designs usually look best on country-style types of fabric, which don't look too delicate or expensive. Like linen, denim, canvas, cotton/polyester blends - simple types of fabrics. Also, make sure the fabric you select isn't too stretchy.
Stabilizing Cross-Stitch Designs
Stabilizing depends on your current fabric, design count and so on, so follow the usual stabilizing rules. Yet, here are a couple of suggestions that work well for most cross-stitch projects:
1. Hoop your fabric with backing under it. If your fabric is very light, use NO-SHOW cut-away. For medium-weight or heavy-weight fabric use regular cut-away backing. And if you really want the stabilizer to go away completely, you can use heavy duty water-soluble backing and wash it away after the embroidery is finished.
2. If your fabric weave is quite loose, or has tendency for absorbing stitches, place a piece of thin water-soluble topping film over it before embroidering. The topping will prevent stitches from sinking into the fabric, and your design will "stand out". 3. Carefully remove jumps AFTER EACH COLOR STOP, when embroidering!
4. When your embroidery is finished, un-hoop it and cut away the stabilizer.
ATTENTION: Avoid using tear-away with cross-stitch designs. When tearing the backing, especially with lower stitch counts, you may damage the stitches and fabric.
We hope that you will love cross stitch designs as much as we do. Usually, it's not possible to achieve so much details and shading with regular embroidery, while maintaining low thickness of the embroidery. That's why cross-stitch technique is so great. Happy Cross-Stitching!

Machine cross stitch designs have a couple of big advantages over regular designs. First - this technique allows to offer each design in 3 sizes (and densities). Second - cross stitch technique is wonderful for making very detailed, natural looking designs, with light and shade effects. To better understand, take a look at a few collections in our machine cross stitch designs category.
The smaller version of same design comes out looking almost like regular embroidery design because of increased density and fabric coverage, while the larger version really looks like traditional cross stitch. You'll see that on photos below.
What Is "Count Size"?
As mentioned earlier, our machine cross-stitch embroidery designs are offered in 3 sizes. In cross-stitching terms this is called count sizes - 14, 16 and 18. These numbers indicate how many stitches per inch are in design. The higher the count, the denser and smaller the design. It goes this way:
14 counts/inch - large size - fairly loose
16 counts/inch - medium size - medium density
18 counts/inch - smallest size - most dense
Here is a close-up photo of rosebud design, embroidered in 3 different counts. By the way - this rose is available for download via our free embroidery designs archive, so you may try it out by yourself.
 |
Determining Suitable Count Size
1. First, check out the final size of your design in each count, and decide which SIZE of the design will better fit your current project. This shall be the primary reason for choosing between 14, 16 or 18-counts.
2. If design size doesn't matter that much for your project, do as follows:
|
2.1 For scenery designs, select 16 or 18 count, because designs featuring landscape scenes and people look nicer when they're quite dense. This is probably because our eyes start to look for details, which are more recognizable on dense, higher contrast designs. 2.2 For floral, abstract or lettering designs choose 14 or 16 count. The individual cross stitches can be seen well in 14 count, and the final embroideries look more like traditional hand cross stitch. 2.3 If your fabric is medium-weight or heavy-weight, and you want it to be totally covered by stitches, without any background showing through, select 18-count. It will also look more like a regular embroidery design, and less like a cross-stitch one. 2.4 For lightweight fabrics, it's better to use the 14-count because of its low density. |
 |
The same rose has been embroidered on tablecloth in three different counts. The largest design is close to us, and the opposite. Such positioning of designs, one after another, creates a feeling of perspective and depth, because our brain thinks that the smaller roses are a lot farther away than they actually are. You may take advantage of this trick every time you want to add 3-d effect to your scenes. For example, to make a quilt with paradise garden, etc.
Thread for Machine Cross-Stitching
Regular poly and rayon embroidery thread (40wt) is great for machine cross stitch designs. Just be sure to get enough thread colors, since cross stitch designs often call for 3-4 gradient colors within each color family, to create the desired light and shade effects. If you have access to thick (30 wt) cotton machine embroidery thread, it's worth trying with 14-count designs (for 16 and 18-count designs thick cotton thread looks too bulky). Bear in mind that cotton thread breaks quite easily, so it may cause you some troubles. But it IS beautiful.
What Fabrics to Choose?
Cross-stitch designs usually look best on country-style types of fabric, which don't look too delicate or expensive. Like linen, denim, canvas, cotton/polyester blends - simple types of fabrics. Also, make sure the fabric you select isn't too stretchy.
Stabilizing Cross-Stitch Designs
Stabilizing depends on your current fabric, design count and so on, so follow the usual stabilizing rules. Yet, here are a couple of suggestions that work well for most cross-stitch projects:
1. Hoop your fabric with backing under it. If your fabric is very light, use NO-SHOW cut-away. For medium-weight or heavy-weight fabric use regular cut-away backing. And if you really want the stabilizer to go away completely, you can use heavy duty water-soluble backing and wash it away after the embroidery is finished.
2. If your fabric weave is quite loose, or has tendency for absorbing stitches, place a piece of thin water-soluble topping film over it before embroidering. The topping will prevent stitches from sinking into the fabric, and your design will "stand out". 3. Carefully remove jumps AFTER EACH COLOR STOP, when embroidering!
4. When your embroidery is finished, un-hoop it and cut away the stabilizer.
ATTENTION: Avoid using tear-away with cross-stitch designs. When tearing the backing, especially with lower stitch counts, you may damage the stitches and fabric.
We hope that you will love cross stitch designs as much as we do. Usually, it's not possible to achieve so much details and shading with regular embroidery, while maintaining low thickness of the embroidery. That's why cross-stitch technique is so great. Happy Cross-Stitching!