You may be interested

Cutwork Designs

Cutwork Butterflies Combo Pack
$53.76

Water Soluble Backing

Polyester Thread

Items for Embroidery

Now on Sale!
How to Create Machine Embroidery Cutwork - Step-By-Step Guide

Cutwork is an antique embroidery technique, which was born in Italy many ages ago. Due to it's outstanding beauty, it quickly spread all over the world, and now can even be accomplished on home embroidery machine, almost effortlessly and very professionally.
In cutwork, decorative holes are cut out into certain spots of embroidered items, to create an intriguing "see through" effect. You've surely seen many ready cutwork embroidery - take a look at this photo, and you'll recognize the technique at once.
Now, when it's clear how cutwork embroideries look like, let's see how they can be done on embroidery machine.
We've developed a special method for digitizing and using cutwork designs. It requires water soluble backing, and properly digitized cutwork designs. Notice - regular zigzag designs are bad for this technique, because they suggest cutting the holes after embroidery is finished, and without experience you're guaranteed to end up with ugly stitchouts, full of fringe. However, if you use appropriate designs and follow our tutorial, you should get great embroideries with ease.
General Suggestions
Prepare the following items:
1. Heavy duty water-soluble backing
2. Light to medium weight fabrics (preferably cotton, linen or other natural fiber that isn't slippery)
3. Cutwork embroidery designs
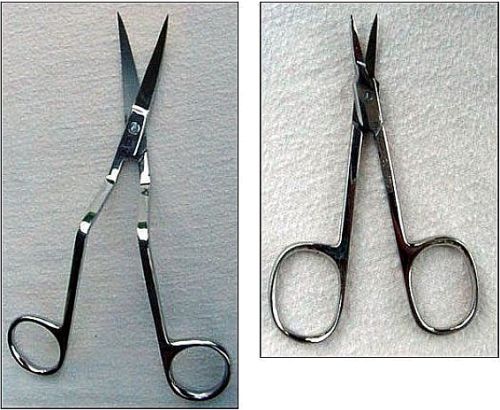
4. Sharp appliqu� scissors (with curved handles, for clean and easy cutting close to embroidery edges).
5. Small scissors with sharp, curved edges (see a photo of both scissors below)
Materials & Colors:
Traditionally, cutwork is embroidered on natural linens and cottons, white on white. The modern variations are wider, and you may embroider the letters on practically any light to medium weight fabric, in darker or lighter thread, or even using metallic thread. Of course, contrast thread colors should be used with care.
Basic Steps (Technique Summary):
1. Hoop fabric & thick wash away backing together (fabric on top, backing under it)
2. Stitch the first thread color (outlines of holes), and remove the hoop (embroidery stays in hoop).
3. Using sharp appliqu� scissors, cut out the outlined areas of fabric (the backing MUST REMAIN).
Use tiny scissors with curved edges to "catch" the fabric layer at first, without damaging the backing.
4. Embroider the rest of design (it will cover all edges nicely).
5. Dissolve water soluble backing in warm water, and wash it away carefully. Cutwork ready!
Detailed Directions:
1. Hooping the background fabric & water-soluble stabilizer: Make sure you've pre-shrinked the fabric. When hooping - be sure there are nothing stretched, and nothing is puckering/bubbling. Large hoops sometimes don't hold the fabric well enough. If your hoop has such tendency, insert a piece of paper towel between rings of all 4-hoop sides, when hoping your future cutwork. Don't forget to hoop the water-soluble backing - it should go under the fabric, as 2-nd fabric layer.
2. Embroider the first thread. For the first thread, any light color will do, because it will be hidden under the main design later. Finished result should look like this:
When machine stops (first color change), remove the hoop from the machine (do NOT unhoop).
3. Cut out only the areas of FABRIC designed for holes, using sharp appliqu� scissors. The stabilizer must stay. Use tiny scissors with curved edges in order to "catch" the fabric layer at first, without damaging the water-soluble backing. Then, continue cutting with appliqu� scissors. The cutting should be done to the very edge of embroidered area. Cut the maximum you can, without damaging the stitches. Here is how the results of this step should look like:
4. Embroider the rest of design (it will cover all edges nicely). See photo in process:
5. Dissolve the wash-away backing following manufacturer instructions. Cutwork ready! Here's how lovely the finished butterfly looks:
And here's a photo of ready projects - all constructed and photographed by Bobbie Berry. The photo shows food tray cover, napkin and neck relaxation pillow, embroidered using cutwork butterflies. You may find these and many other cutwork embroidery designs here.

In cutwork, decorative holes are cut out into certain spots of embroidered items, to create an intriguing "see through" effect. You've surely seen many ready cutwork embroidery - take a look at this photo, and you'll recognize the technique at once.
Now, when it's clear how cutwork embroideries look like, let's see how they can be done on embroidery machine.
We've developed a special method for digitizing and using cutwork designs. It requires water soluble backing, and properly digitized cutwork designs. Notice - regular zigzag designs are bad for this technique, because they suggest cutting the holes after embroidery is finished, and without experience you're guaranteed to end up with ugly stitchouts, full of fringe. However, if you use appropriate designs and follow our tutorial, you should get great embroideries with ease.
General Suggestions
Prepare the following items:
1. Heavy duty water-soluble backing
2. Light to medium weight fabrics (preferably cotton, linen or other natural fiber that isn't slippery)
3. Cutwork embroidery designs
4. Sharp appliqu� scissors (with curved handles, for clean and easy cutting close to embroidery edges).
5. Small scissors with sharp, curved edges (see a photo of both scissors below)
 |
Materials & Colors:
Traditionally, cutwork is embroidered on natural linens and cottons, white on white. The modern variations are wider, and you may embroider the letters on practically any light to medium weight fabric, in darker or lighter thread, or even using metallic thread. Of course, contrast thread colors should be used with care.
Basic Steps (Technique Summary):
1. Hoop fabric & thick wash away backing together (fabric on top, backing under it)
2. Stitch the first thread color (outlines of holes), and remove the hoop (embroidery stays in hoop).
3. Using sharp appliqu� scissors, cut out the outlined areas of fabric (the backing MUST REMAIN).
Use tiny scissors with curved edges to "catch" the fabric layer at first, without damaging the backing.
4. Embroider the rest of design (it will cover all edges nicely).
5. Dissolve water soluble backing in warm water, and wash it away carefully. Cutwork ready!
Detailed Directions:
1. Hooping the background fabric & water-soluble stabilizer: Make sure you've pre-shrinked the fabric. When hooping - be sure there are nothing stretched, and nothing is puckering/bubbling. Large hoops sometimes don't hold the fabric well enough. If your hoop has such tendency, insert a piece of paper towel between rings of all 4-hoop sides, when hoping your future cutwork. Don't forget to hoop the water-soluble backing - it should go under the fabric, as 2-nd fabric layer.
2. Embroider the first thread. For the first thread, any light color will do, because it will be hidden under the main design later. Finished result should look like this:
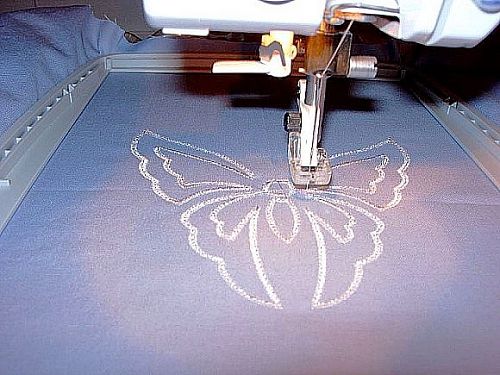 |
When machine stops (first color change), remove the hoop from the machine (do NOT unhoop).
3. Cut out only the areas of FABRIC designed for holes, using sharp appliqu� scissors. The stabilizer must stay. Use tiny scissors with curved edges in order to "catch" the fabric layer at first, without damaging the water-soluble backing. Then, continue cutting with appliqu� scissors. The cutting should be done to the very edge of embroidered area. Cut the maximum you can, without damaging the stitches. Here is how the results of this step should look like:
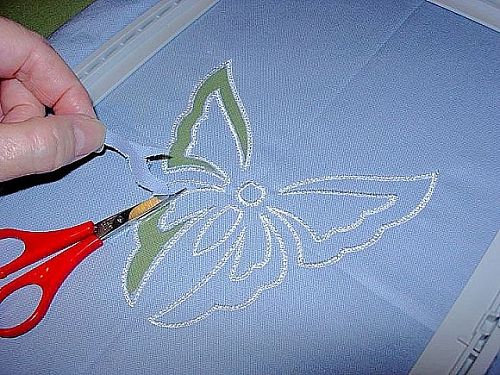 |
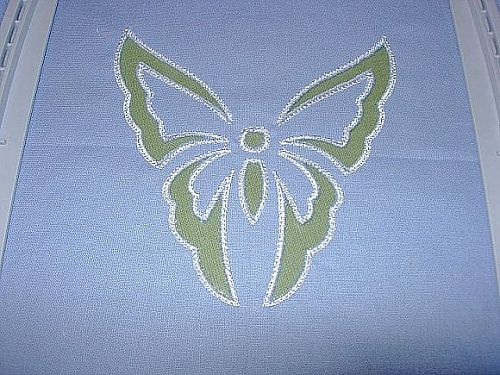 |
4. Embroider the rest of design (it will cover all edges nicely). See photo in process:
 |
5. Dissolve the wash-away backing following manufacturer instructions. Cutwork ready! Here's how lovely the finished butterfly looks:
 |
And here's a photo of ready projects - all constructed and photographed by Bobbie Berry. The photo shows food tray cover, napkin and neck relaxation pillow, embroidered using cutwork butterflies. You may find these and many other cutwork embroidery designs here.